Fresco Cartoon - Directions.
|
|
|
|
Fresco Cartoon is the most important step in creation of Fresco - it is your "blueprint" for all of the future work. The layout of giornatas, values, shadows, composition - all those and other elements are developed during this step.
|
"Cartoon" - a full scale drawing of the future fresco. Cartoons are drawn on regular paper with pencil, graphite, charcoal, sepia chalk, etc., etc. The purpose of a cartoon is a thorough study and final rendition of the composition, light, shadow, details of the future fresco, it is a preparatory drawing taken to the next level. Correctly done cartoon is a "stand along" artwork. Although optional in other painting mediums, Cartoon is essential when painting in Fresco not only as the main guideline for transferring the design onto freshly laid (fresco) plaster, but also as the main tool and method of understanding and orchestrating the steps for painting of the corresponding fresco.
In this chapter we will speak about specifics of small and large
fresco cartoons
, providing you with complete directions.
Small Fresco Cartoon
Preparation of the cartoon for small fresco slightly differs from the preparation of the large fresco cartoon. In this article we discuss the smal fresco cartoon. Since this article is intended for the general oudience and/or beginner fresco artist it makes sence to illustrate the directions with the actual examples from our fresco workshops. During our workshops artists work from their own cartoons that they have to prepare at home prior to the class. Since many of our students have little or no practical experience in fresco we do not judge nor expect students cartoons to be perfect or even fully completed. However it will be helpful to establish some quidelines and explain the resons behind them.
Verne Busby flew from Canada to take our
workshop
in 2003, his cartoons prepared for the class surpassed all our expectations to the point that we will use his work to illustrate this article. Please keep in mind we are not looking for or suggesting a particular style; on the contrary we hope that we will have a wide variety of "styles" (aka: modern, abstract, classic, representational or not) present during the class, so students can experience and share as many alternative methods and solutions to achieving desired results on plaster as possible. The "guidelines" are directed to explain the "uni-system" of building up color, shadow, depth and contrast when working in fresco.
Summizing we can say that "Cartoon" is a "Checklist" for the steps in actual painting on wet plaster. You will repeat this steps one by one using color while painting the actual fresco and the result directly depends on how clear and this "Checklist" is!
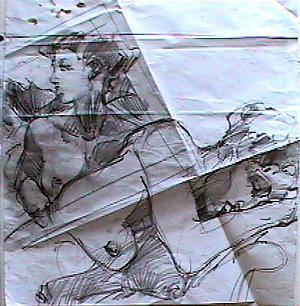
|
| In the example above, Artist have selected just a "headshot" to be painted (note the perimeter lines). It is clear that similar approach in working with large-fresco cartoon will be somewhat wasteful. However every detail needs to be defined and studied so often multiple to scale cartoons of the details and "angles" are produced and small "study" frescoes are painted before the final cartoon is completed. |
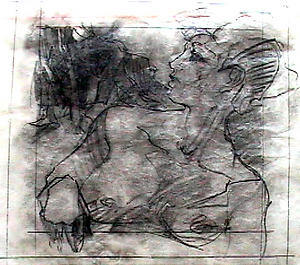
|
| This example shows the tracing after it has been used for transfer (note the charcoal dust covering the rendition) After the final design area to be painted is finalized (see cartoon at the top of the column) a tracing paper is layed over the selection and a clean outline is transferred which is then perforated and transferred onto fresh plaster using charcoal dust. The original cartoon is left clean and will be used as the main reference for the artist to build up the shadows, volume, color intencity. it is virtualy impossible to complete a fresco without developing cartoon first - remember you will not have time to do it on plaster as well as you will not be able to "paint over" the wrongly placed shadows. Similar to watercolor fresco paints generally transparent.
|
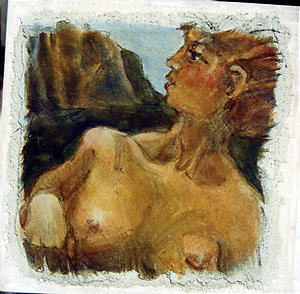
|
| And this is the one for which the original cartoon has been adjusted (cropped) to fit 16'X16" size. (note that the detail had been enlarged conciderably to fill the tile). This adjustment was made because the original design had too many small details, too many for that size of a fresco. Which would have not allowed the student to experience the process of painting on wet plaster to the extend it was needed to understand the specifics of the technique. |
complete Small Fresco Cartoon article (click here, new window)
Buon Fresco Foundations: FRESCO CARTOON
Large Fresco Cartoon
The main difference between large fresco cartoon and small fresco cartoon is that the aproach is reversed. Unlike for the Small Fresco Cartoon instead of "cropping" of the initial rendering/sketch for the best composition shot you will be "constructing" your composition to be easily devided (segmented) into giornatas (daily painting sections).
Large frescoes are painted in sections (giornatas), one section at the time where each following section is added, plastered "into" the previously painted one. In other to "hide" the joint lines (areas where the giornatas are mended to each other) artist has to plan the composition accordingly creating "natural cutlines" or "composition blocks" which have natural edges where the cut/mending plaster joint lines can be consealled.
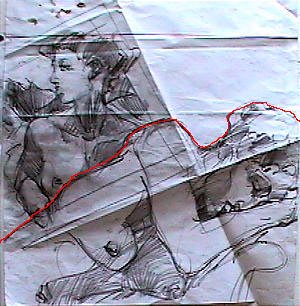
Using Verne's cartoon from previous "Small Fresco Cartoon Guide" I have indicated in red the possible cutline which will be invisible in the completed fresco since it naturally appears in the composition separating foreplan figure and background.
When finalising a large fresco composition from initial sketches, artist must plan/incorporate in it several "composition blocks" - one for each giornata. Sometimes it would be nescessary to andjust the original idea and add, remove or rearange composition elements to create natural cutlines.
Below is an example of multiple giornatas taken from my "Albuquerque Fresco":
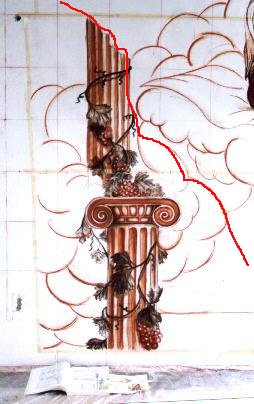
This picture (above) displays the very left section of the Albuquerque
Fresco Cartoon
, the red line indicates planned cutline - everything you see below that line has been painted in one painting day - one giornata.
Picture below shows this giornata as it has been just painted (you can see it being slightly darker, still wet - then the adjoining giornatas). Redline indicates the joining/cut line.
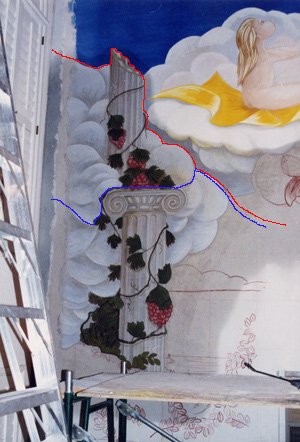
This is quite large giornata to be painted in one day and many could be intimidated by the task to paint it in one day - blue line shows a possible way to "cut it in two" if I would have decided to paint this section in two days.
To learn Fresco Painting hands on and for our real-life classes and workshops visit FrescoSchool.com (new window)
for more examples of cutlines visit this website - Dolphin Fresco (new window)
Copyright 2005++ iLia Anossov & Fresco School


